[ AdSense Leaderboard (728x90) or Responsive Code ]

How to Choose a Baby Stroller: The Ultimate 2026 Buying Guide

How to Choose a Baby Stroller The Ultimate 2026 Buying Guide

Figuring out how to choose a baby stroller is one of the most important decisions you will make as a new parent. It is not just about picking the one that looks the best; it is about finding a reliable companion that fits seamlessly into your daily life.

With so many options on the market, it is easy to feel overwhelmed. Should you get a full travel system, a lightweight umbrella stroller, or a rugged jogger? The secret to making the right choice is to stop looking at what is trending and start looking at how you actually spend your week.

Guidewale guide you exactly how to choose a baby stroller that will keep your baby safe, comfortable, and ready for any adventure.


1. Match the Stroller to Your Lifestyle

The fastest way to narrow down your options is to evaluate your daily routine and environment.

City Living and Public Transit

If you live in a walk-up apartment or frequently use buses and subways, weight and foldability are your top priorities. You want a lightweight travel stroller that you can collapse with one hand while holding your baby in the other.

Suburban Life and Frequent Driving

If your daily routine involves loading and unloading the stroller from a car trunk, a travel system is usually the best bet. These systems include an infant car seat that clicks directly into the stroller frame, allowing you to move a sleeping baby from the car to the stroller without waking them up.

Active and Outdoorsy Parents

If you love jogging or hiking on uneven trails, look into jogging strollers. These models feature large, air-filled rubber tires and advanced suspension systems to absorb shocks, ensuring a smooth ride on gravel, grass, or bumpy sidewalks.

Stroller Selection Guide Tool

Answer 2 quick questions to instantly find your perfect stroller type!


2. Essential Features to Look For

Once you know the type of stroller you need, it is time to look at the mechanics. When learning how to choose a baby stroller, never compromise on these non-negotiable features:

  • The 5-Point Harness: Safety is paramount. A 5-point harness secures your baby at the shoulders, hips, and between the legs, preventing them from slipping or climbing out.
  • A Reliable Braking System: Test the brakes before you buy. One-step brakes that lock both rear wheels simultaneously are ideal for quick stops on hills or busy streets.
  • Newborn Compatibility: Newborns lack head and neck control, so they must lie completely flat. Ensure it has a full-recline feature, a bassinet attachment, or car seat compatibility.
  • One-Hand Fold: You will often find yourself holding your baby or a diaper bag. A stroller that folds quickly and stands on its own is an absolute game-changer.
  • Generous Canopy: Look for an extended canopy with UPF 50+ protection to shield your baby from the sun, wind, and light rain.

3. The 5 Best Baby Strollers of 2026

Based on safety ratings, parent reviews, and lifestyle versatility, here are the top five baby strollers leading the market this year.

1. Loopie Hop Baby Stroller

Designed for urban parents, the Loopie Hop balances premium features with a budget-friendly price. It boasts a brilliant one-hand fold, a sturdy aluminum frame, and 360° ventilation.

Loopie Hop Baby Stroller

2. Nuna TRVL LX

If you are a frequent traveler, this is your holy grail. The Nuna TRVL LX features an ultra-smooth auto-fold mechanism and fits seamlessly into airplane overhead bins.

Nuna TRVL LX Baby Stroller

3. Joie Tourist

The Joie Tourist is the ultimate compact powerhouse. It is a cabin-sized stroller that actually offers a lie-flat recline for newborns, perfect for navigating tight spaces.

Joie Tourist Baby Stroller

4. Chicco Bravo 3-in-1 Trio Travel System

For suburban families who rely heavily on cars, the Chicco Bravo is a top-tier choice. It comes with the highly-rated KeyFit 30 infant car seat, clicking securely into the frame in seconds.

Chicco Bravo 3-in-1 Trio Travel System

5. Graco Modes Pramette Travel System

This stroller functions as an infant car seat carrier, a true bassinet pram for newborns, and a reversible toddler stroller. It is incredibly versatile and grows with your child.
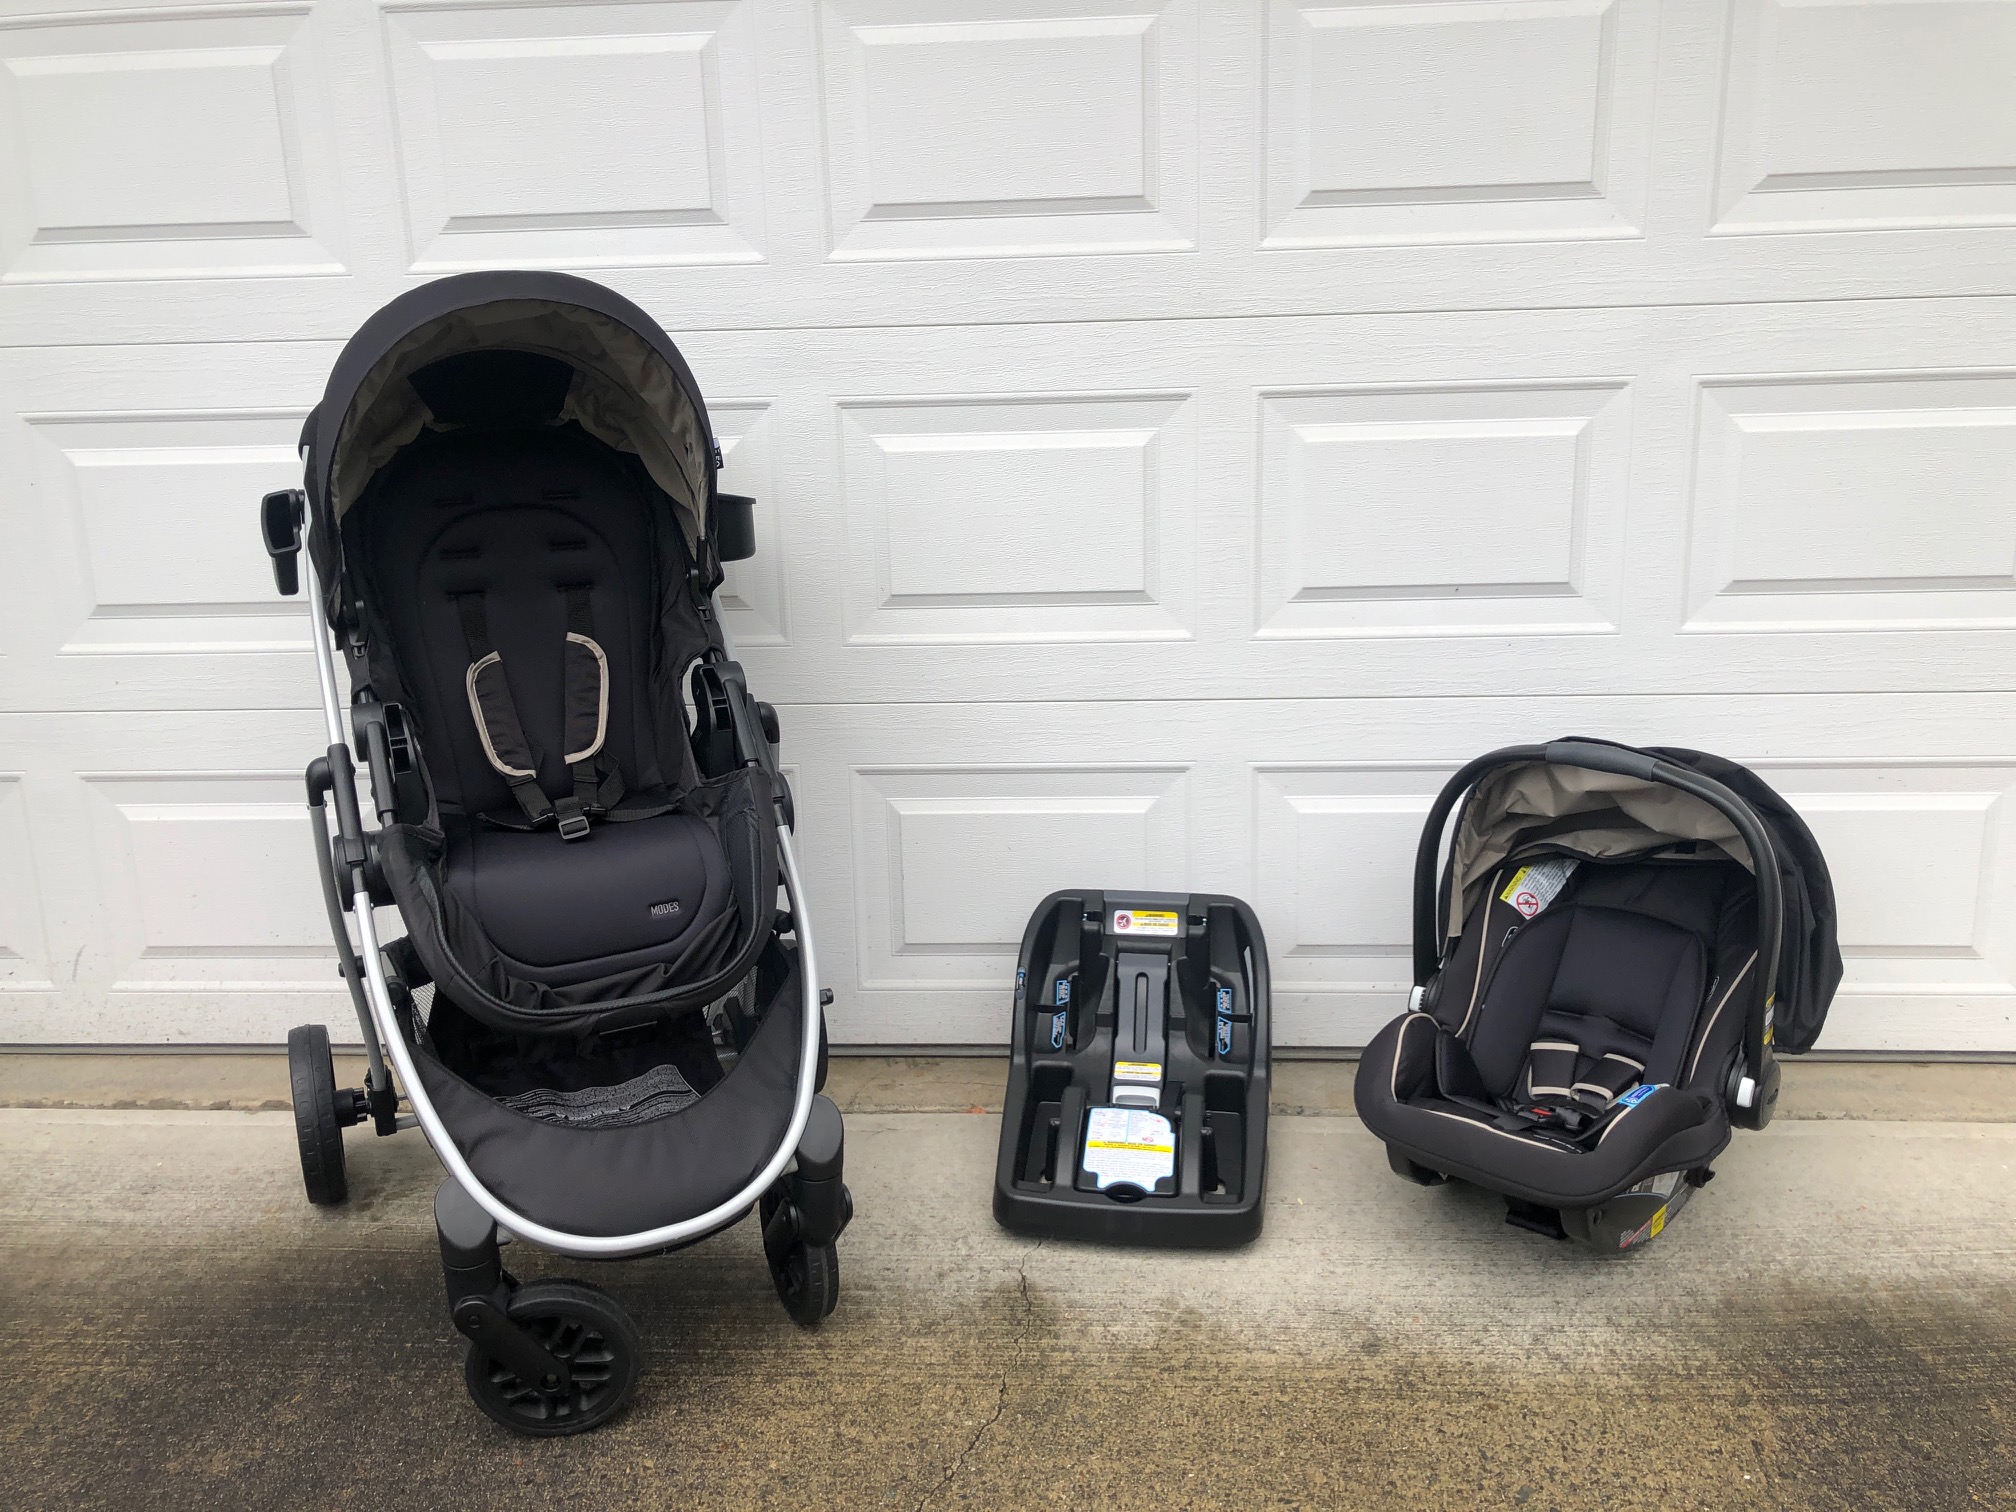
Graco Modes Pramette Travel System

4. Frequently Asked Questions (FAQs)

When can a baby sit in a regular stroller?
Babies can usually transition to a regular upright stroller seat around 6 months old, once they have full head and neck control. Before that, they need a bassinet, an infant car seat attachment, or a stroller with a completely flat recline.

Are travel system strollers worth it?
Yes, especially if you drive frequently. Being able to transfer a sleeping baby from the car to the stroller without unbuckling them saves time and prevents unnecessary waking.

Can I take a stroller on an airplane?
Yes. Most airlines allow you to check a stroller at the ticket counter or gate-check it for free. Certain lightweight, compact strollers are even designed to fold small enough to fit inside the overhead bin.

Final Note: Knowing how to choose a baby stroller doesn't have to be stressful. Start by identifying the hardest part of your daily routine and pick the stroller that solves that specific problem!

How to Brew Green Tea: The Perfect Cup Every Time

How to Brew Green Tea The Perfect Cup Every Time

If your green tea tastes bitter or grassy, you are not alone. Many people give up on this healthy beverage simply because they don't know the right technique.

Practicing with Guidewale exactly how to brew green tea unlocks a smooth, delicate, and naturally sweet flavor profile. It all comes down to controlling the water temperature and the steep time.


What You Need for the Perfect Cup

Before we get to the steps, gather your essentials. High-quality ingredients make a massive difference in the final taste of your brew.

  • Green Tea Leaves: Loose-leaf tea offers the freshest flavor, but high-quality tea bags work perfectly fine as well.
  • Filtered Water: Tap water contains minerals and chlorine that can easily ruin the delicate tasting notes. Always start with fresh, filtered water.
  • A Kettle: A temperature-controlled electric kettle is ideal. If using a stovetop kettle, just monitor the heat closely.
  • A Strainer or Infuser: You need a way to quickly remove the loose leaves once the steeping time is up.

How to Brew Green Tea: Step-by-Step

Follow this simple process to extract the maximum amount of healthy antioxidants and rich flavors without leaving a bitter aftertaste.

  1. Heat the Water to the Right Temperature: Green tea leaves are highly delicate and will burn if the water is too hot. Heat your filtered water to 160°F – 180°F (70°C – 82°C). If you don't have a thermometer, simply bring the water to a boil and let it sit off the heat for about 2 to 3 minutes before pouring.
  2. Measure Your Tea Leaves: The golden ratio for the best flavor is one teaspoon (about 2 grams) of loose-leaf green tea per 8 ounces of water. For a stronger flavor, add a little more tea rather than increasing your steeping time.
  3. Steep the Tea: Pour the hot water over your tea leaves and immediately set a timer. Green tea should only steep for 1 to 3 minutes. Japanese green teas usually need only 1 minute, while Chinese varieties might need 2 to 3 minutes.
  4. Strain and Enjoy: Promptly remove the tea leaves or the tea bag the moment your timer goes off. Leaving the leaves in the water causes over-extraction. Enjoy your tea plain, or add a dash of honey or lemon.

3 Expert Tips for a Better Brew

  • Pre-warm your cup: Pour a little hot water into your mug, swirl it around, and dump it out before brewing. This keeps your tea hotter for longer.
  • Reuse your leaves: High-quality loose-leaf green tea can be steeped two or three times. Just add an extra 30 seconds to your steep time for each subsequent brew.
  • Skip the milk: Milk binds to the beneficial antioxidants (catechins) found in green tea, making them harder for your body to absorb. Drink it clear for maximum health benefits.

Frequently Asked Questions

Should I use boiling water to brew green tea?

No, boiling water will burn the delicate green tea leaves and make the tea taste bitter. The ideal water temperature is between 160°F and 180°F (70°C – 82°C).

How long should I steep green tea?

Green tea should only steep for 1 to 3 minutes. Over-steeping is the most common reason green tea tastes bitter.

Can I reuse loose-leaf green tea?

Yes! High-quality loose-leaf green tea can be steeped two or three times. Just add an extra 30 seconds to your steep time for each subsequent brew.

Finding Your Way: The Ultimate Guide to Maps of Lanzarote


Finding Your Way: The Ultimate Guide to Maps of Lanzarote


Planning a holiday to the stunning Canary Islands? If you are heading to the "Island of Volcanoes," you are in for a brilliant treat. But before you pack your sun cream and walking shoes, you will want to get familiar with the lay of the land.

Whether you are hunting for hidden golden beaches, planning a road trip through dramatic volcanic landscapes, or simply trying to find your hotel, having reliable maps of Lanzarote is an absolute must.

Here is a quick, easy-to-read guide on how to navigate the island like a local.

Why You Need a Map of Lanzarote, Spain

Lanzarote is not a massive island—you can drive from the very top to the bottom in under two hours—but it is incredibly diverse. The landscape changes rapidly from lively coastal resorts to lunar-like craters and quiet, whitewashed villages.

Having a good map of Lanzarote Spain helps you make the most of your holiday time. It allows you to plan your day trips efficiently so you aren't spending hours doubling back on yourself. Plus, it helps you discover the secret, unspoiled spots tucked away just a few miles from the main tourist hubs.

Digital vs. Paper: What’s Best for Your Holiday?

The Ultimate Guide to Maps of Lanzarote


When it comes to finding your way around, you have two main options, and we highly recommend using a mix of both!

  • Interactive Mobile Maps: Downloading an offline map of Lanzarote island on apps like Google Maps or Maps.me is fantastic. It is brilliant for real-time driving directions in your hire car or for finding a highly-rated tapas restaurant near you.

    Top Tip: Download the offline map while you are on your hotel's Wi-Fi so you don't use up your mobile data whilst out exploring!

  • Physical Tourist Maps: Never underestimate the charm of a classic paper map! You can usually pick these up for free at the airport, tourist information centres, or your hotel reception. They won't run out of battery, and they are perfect for spreading out on the breakfast table to plan your day's adventure.

Quick Reference: Lanzarote Driving Distances

To help you build a mental map of the island, here is a handy cheat sheet showing the driving distances and average travel times from Arrecife Airport (ACE) to the main resorts and attractions:

DestinationRegionDistance from AirportAverage Drive Time
Puerto del CarmenSouth-East10 km10 - 15 mins
Costa TeguiseEast15 km15 - 20 mins
Playa BlancaDeep South33 km35 - 40 mins
Timanfaya National ParkWest / Centre20 km25 - 30 mins
Jameos del AguaNorth30 km35 - 40 mins

5 Must-Pin Spots for Your Digital Map

Before you fly, open up your phone's map application and drop a pin on these incredible locations so you do not miss them:

  1. Papagayo Beaches (Playas de Papagayo): Located in the south, these are arguably the most beautiful, sheltered golden coves on the island.

  2. Timanfaya National Park (Montañas del Fuego): The heart of the island's volcanic landscape. You will feel like you are walking on Mars!

  3. Mirador del Río: A breathtaking viewpoint in the far north, offering panoramic views over the neighbouring tiny island of La Graciosa.

  4. Teguise (La Villa): The ancient capital in the centre of the island, famous for its massive Sunday market and traditional cobbled streets.

  5. El Golfo (The Green Lagoon): A striking, bright green volcanic lake sitting right next to a black sand beach on the rugged west coast.


Ready to Explore?

With the right maps of Lanzarote in your pocket or on your phone, you are completely set for an unforgettable European getaway. Get out there, explore the volcanoes, find your perfect beach, and enjoy everything this spectacular island has to offer!

Would you like me to write a couple of high-converting SEO meta descriptions and title tags for this updated page as well?

What Language is Spoken in Lanzarote? Your Quick Holiday Guide

 If you are planning a sunshine getaway to the beautiful Canary Islands, you might be wondering exactly what language is spoken in Lanzarote. Whether you are heading out for a relaxing beach holiday or planning to explore the island's famous volcanic landscapes, knowing how to communicate makes any trip much smoother.

What Language is Spoken in Lanzarote? Your Quick Holiday Guide


What Language is Spoken in Lanzarote? Your Quick Holiday GuideWhat Language is Spoken in Lanzarote? Your Quick Holiday Guide

The short answer is Spanish. However, because Lanzarote is such a massive favourite for European holidaymakers, you will hear a fantastic mix of languages wherever you go.

Let's break down exactly what to expect and what you need to know before you pack your bags.

The Official Lanzarote Language: Spanish

As Lanzarote is part of Spain, the official and primary language is Spanish. However, the locals—known as Conejeros—speak a specific dialect called Canarian Spanish.

If you learned a bit of Spanish in school, you might notice that Canarian Spanish sounds slightly different from the language spoken in mainland Spain (like in Madrid or Barcelona). It is actually much closer to the Spanish spoken in Latin America or Andalusia.

Here is what makes Canarian Spanish unique:

  • A softer "C" and "Z": Instead of a "th" lisp sound used in mainland Spain, locals pronounce these letters like an "s".

  • Dropped endings: Locals tend to drop the "s" at the end of words, which can make the language sound faster and smoother.

  • Unique vocabulary: They use a few local words you won't find on the mainland, like guagua (pronounced "wawa") instead of autobús for the local bus.

Do I Need to Speak Spanish on Holiday in Lanzarote?

The simple answer is no. You do not need to be fluent in the Lanzarote language to have a brilliant holiday.

Because tourism is the island's biggest industry, English is incredibly widely spoken. In major tourist resorts like Puerto del Carmen, Playa Blanca, and Costa Teguise, almost everyone working in hotels, restaurants, bars, and shops will speak excellent English.

Alongside English, you will also frequently hear:

  • German: Very common across the island, with many menus and signs printed in German.

  • French and Italian: Frequently spoken in tourist hubs due to the high volume of European visitors.

  • Dutch and Scandinavian languages: Often understood by tour operators and hotel staff.

However, if you venture out of the main resorts to hire a car and explore the quieter, traditional villages in the north or centre of the island, English is less common. In these rural spots, knowing a few basic Spanish phrases will go a long way.

Essential Spanish Phrases for Your Trip

Even though you can easily get by with English, the locals always appreciate it when visitors make an effort. Throwing in a friendly Spanish greeting at a local tapas bar is a great way to earn a smile.

Here are a few simple words to keep in your back pocket:

EnglishSpanishPronunciation
HelloHolaOh-la (the H is silent)
PleasePor favorPor fa-vor
Thank youGraciasGra-see-as
Yes / NoSí / NoSee / No
The bill, pleaseLa cuenta, por favorLa kwen-ta, por fa-vor
Do you speak English?¿Habla inglés?Ab-la in-gles?

The Verdict

So, what language is spoken in Lanzarote? Officially, it is Spanish, but practically, it is a brilliantly international island. You can confidently travel there with just English, but bringing along a little bit of Spanish will definitely add a touch of authentic charm to your holiday.


MRP Sticker with Barcode की ज़रूरत क्यों है?

 अगर आप एक मैन्युफैक्चरर (Manufacturer), रिटेलर या ई-कॉमर्स सेलर हैं, तो आपको अपने प्रोडक्ट्स की पैकेजिंग और बिलिंग को प्रोफेशनल बनाने की ज़रूरत अक्सर महसूस होती होगी। आज के डिजिटल दौर में, किसी भी प्रोडक्ट पर mrp sticker with barcode होना सिर्फ एक ज़रूरत नहीं, बल्कि कानूनी अनिवार्यता (Legal Metrology Rules के तहत) और बिज़नेस को स्मार्ट बनाने का तरीका है।

इस आर्टिकल में, हम विस्तार से जानेंगे कि एक परफेक्ट mrp sticker with barcode कैसे बनाया जाता है, इसमें कौन-सी जानकारियाँ होनी चाहिए, और इसे प्रिंट करने का सही तरीका क्या है।


MRP Sticker with Barcode की ज़रूरत क्यों है?

एक साधारण कागज़ की पर्ची की तुलना में, बारकोड वाला MRP स्टिकर आपके बिज़नेस को कई फायदे देता है:

  1. तेज़ और सटीक बिलिंग (Fast Billing): काउंटर पर प्रोडक्ट को स्कैन करते ही सिस्टम में उसकी कीमत और डिटेल्स आ जाती हैं, जिससे ग्राहकों को लाइन में इंतज़ार नहीं करना पड़ता।

  2. इन्वेंट्री मैनेजमेंट (Inventory Tracking): आपके स्टॉक में कितने प्रोडक्ट्स बचे हैं और कितने बिक गए, बारकोड स्कैनिंग से इसका हिसाब रखना बेहद आसान हो जाता है।

  3. कानूनी नियम (Legal Compliance): भारत सरकार के नियमों के अनुसार, हर पैक्ड प्रोडक्ट पर उसकी MRP (सभी करों सहित), मैन्युफैक्चरिंग डेट और अन्य ज़रूरी जानकारियाँ साफ़ तौर पर छपी होनी चाहिए।

  4. कस्टमर का भरोसा (Professional Look): एक साफ-सुथरा और प्रोफेशनल स्टिकर कस्टमर के मन में आपके ब्रांड के प्रति विश्वास जगाता है।


एक सही MRP स्टिकर में क्या-क्या होना चाहिए?

अपना स्टिकर डिज़ाइन करने से पहले, यह सुनिश्चित कर लें कि उसमें निम्नलिखित डिटेल्स मौजूद हों:

  • Product Name (उत्पाद का नाम): प्रोडक्ट क्या है, इसका स्पष्ट विवरण।

  • MRP (Maximum Retail Price): हमेशा "Inclusive of all taxes" (सभी करों सहित) लिखें।

  • Net Quantity (कुल मात्रा): वज़न (g/kg) या पीस (pcs) में।

  • Manufacturing / Expiry Date: प्रोडक्ट कब बना है और कब तक इस्तेमाल किया जा सकता है।

  • Barcode (बारकोड): स्कैन करने योग्य बारकोड लाइनें और उसके नीचे उसका नंबर।

  • Customer Care Details: कंपनी का पता, ईमेल या फोन नंबर।


Tutorial: अपना खुद का MRP Sticker with Barcode कैसे बनाएं?

आप कुछ बेसिक सॉफ्टवेयर और प्रिंटर की मदद से आसानी से अपने प्रोडक्ट्स के लिए स्टिकर बना सकते हैं। नीचे दिए गए स्टेप्स को फॉलो करें:

1.सॉफ्टवेयर और प्रिंटर चुनें:सही टूल्स के बिना स्टिकर नहीं बन सकता.

सबसे पहले आपको एक Barcode Printer (जैसे- TVS, TSC, या Zebra का थर्मल प्रिंटर) और Label Design Software की ज़रूरत होगी। ज़्यादातर प्रिंटर्स के साथ 'Bartender' या 'ZebraDesigner' जैसा फ्री सॉफ्टवेयर आता है। इसके अलावा, आप अपने POS/Billing सॉफ्टवेयर का भी इस्तेमाल कर सकते हैं।

2.बारकोड नंबर (Symbology) तय करें:

बारकोड दो तरह के हो सकते हैं। अगर आप प्रोडक्ट सुपरमार्केट या ई-कॉमर्स (Amazon/Flipkart) पर बेच रहे हैं, तो आपको GS1 India से रजिस्टर करके EAN-13 या UPC बारकोड लेना होगा। अगर आप सिर्फ अपनी दुकान के लिए स्टिकर बना रहे हैं, तो आप 'Code 128' का इस्तेमाल करके खुद के नंबर (जैसे- 1001, 1002) जनरेट कर सकते हैं।

3.लेबल का साइज़ सेट करें:सॉफ्टवेयर में Page Setup.

सॉफ्टवेयर खोलें और अपने स्टिकर रोल के हिसाब से साइज़ सेट करें। रिटेल में आमतौर पर 50mm x 25mm या 38mm x 25mm साइज़ के स्टिकर सबसे ज़्यादा इस्तेमाल किए जाते हैं।

4.डिटेल्स टाइप करें (Text Fields):

डिज़ाइन एरिया में टेक्स्ट बॉक्स लें और उसमें प्रोडक्ट का नाम, MRP, Net Weight और Mfg Date टाइप करें। फॉन्ट ऐसा चुनें जो आसानी से पढ़ा जा सके (जैसे Arial या Calibri)। ध्यान रहे कि MRP सबसे हाइलाइटेड हो।

5.बारकोड एलिमेंट ऐड करें:

सॉफ्टवेयर के टूलबार से 'Barcode' आइकॉन चुनें और उसे स्टिकर पर ड्रैग करें। अब इसकी प्रॉपर्टीज़ में जाकर अपना बारकोड नंबर (जैसे- 8901234567890) डालें। बारकोड की लाइनें इतनी बड़ी होनी चाहिए कि स्कैनर उन्हें आसानी से पढ़ सके।

6.प्रिंट और टेस्ट करें:सीधे सैकड़ों कॉपी प्रिंट न करें.

पहले सिर्फ 1 या 2 स्टिकर प्रिंट करें। अपने बारकोड स्कैनर या मोबाइल के बारकोड स्कैनर ऐप से उसे स्कैन करके देखें। अगर स्कैन करने पर सही नंबर आ रहा है और स्टिकर का अलाइनमेंट सही है, तो आप बाकी कॉपीज़ प्रिंट कर सकते हैं।


बेहतरीन प्रिंटिंग के लिए कुछ प्रो-टिप्स (Pro Tips)

  • पेपर क्वालिटी: हमेशा अच्छे क्वालिटी वाले Direct Thermal या Thermal Transfer (रिबन के साथ) लेबल्स का ही इस्तेमाल करें, ताकि छपाई जल्दी मिटे नहीं।

  • हीट सेटिंग (Darkness): अगर बारकोड की लाइनें हल्की (Light) आ रही हैं, तो प्रिंटर की सेटिंग्स में जाकर 'Darkness' या 'Print Speed' को थोड़ा एडजस्ट करें।

  • पर्याप्त जगह (Quiet Zone): बारकोड की लाइनों के बाएँ और दाएँ तरफ थोड़ी खाली जगह ज़रूर छोड़ें। अगर टेक्स्ट बारकोड से टच होगा, तो स्कैनर उसे पढ़ नहीं पाएगा।


निष्कर्ष

एक सही mrp sticker with barcode आपके प्रोडक्ट की पूरी पहचान होता है। यह न सिर्फ आपके रोज़मर्रा के ऑपरेशन्स (बिलिंग और इन्वेंट्री) को तेज़ करता है, बल्कि आपके ब्रांड को एक प्रोफेशनल लुक भी देता है। ऊपर दिए गए स्टेप्स को अपनाकर आप बहुत आसानी से अपने प्रोडक्ट्स के लिए खुद के कस्टमाइज़्ड स्टिकर्स बना सकते हैं।

GS1 बारकोड और इंटरनल बारकोड (Code 128) में क्या अंतर है और मुझे कौन सा चुनना चाहिए?

 यह एक बहुत ही महत्वपूर्ण और बिज़नेस से जुड़ा सवाल है। सही बारकोड का चुनाव पूरी तरह से इस बात पर निर्भर करता है कि आप अपना प्रोडक्ट कहाँ और कैसे बेचना चाहते हैं।

इन दोनों के बीच के अंतर को समझने से आपको अपने बिज़नेस के लिए सही निर्णय लेने में मदद मिलेगी। आइए इसे विस्तार से समझते हैं:

1. GS1 बारकोड (Global Standard 1)

GS1 एक अंतरराष्ट्रीय संस्था है जो पूरी दुनिया के लिए बारकोड (जैसे EAN-13 या UPC) जारी करती है। जब आप GS1 से बारकोड लेते हैं, तो वह नंबर पूरी दुनिया में सिर्फ आपके प्रोडक्ट के लिए रिज़र्व हो जाता है।

  • कहाँ ज़रूरी है: अगर आप अपने प्रोडक्ट्स को Amazon, Flipkart, Myntra जैसे ई-कॉमर्स प्लेटफॉर्म्स पर बेचना चाहते हैं, या Reliance Fresh, D-Mart, Big Bazaar जैसे बड़े रिटेल चेन्स (Supermarkets) में सप्लाई करना चाहते हैं।

  • फायदे: इसे दुनिया का कोई भी स्कैनर पढ़ेगा, तो वह आपके ही प्रोडक्ट की डिटेल्स दिखाएगा। यह आपके ब्रांड को एक ग्लोबल पहचान देता है।

  • नुकसान: यह फ्री नहीं होता। इसके लिए आपको GS1 India की वेबसाइट पर रजिस्ट्रेशन फीस और सालाना रिन्यूअल फीस देनी पड़ती है।

2. इंटरनल बारकोड (Code 128)

Code 128 एक 'ओपन-सोर्स' और इंटरनल (आंतरिक) बारकोड फॉर्मेट है। इसका कोई ग्लोबल डेटाबेस नहीं होता। आप अपने कंप्यूटर सॉफ्टवेयर से अपनी मर्ज़ी का कोई भी नंबर या अक्षर डालकर इसे बना सकते हैं।

  • कहाँ ज़रूरी है: अगर आप अपनी खुद की दुकान चला रहे हैं, अपने ही शोरूम में बिलिंग करना चाहते हैं, या अपने गोदाम (Warehouse) में इन्वेंट्री ट्रैक करना चाहते हैं।

  • फायदे: यह बिल्कुल फ्री है। इसे आप किसी भी फ्री बारकोड जनरेटर या बिलिंग सॉफ्टवेयर (जैसे Tally, Marg, Vyapar) से खुद जनरेट कर सकते हैं। Code 128 में आप नंबर के साथ-साथ अक्षर (A-Z) भी इस्तेमाल कर सकते हैं (जैसे: SHIRT-XL-001)।

  • नुकसान: इसे आप Amazon या किसी बड़े मॉल में इस्तेमाल नहीं कर सकते, क्योंकि हो सकता है कि जो नंबर आपने चुना है, वही नंबर किसी और कंपनी ने भी अपने सिस्टम में रखा हो (Conflict)।

तुलना (Quick Comparison)

फीचर (Feature)GS1 बारकोड (जैसे EAN-13)इंटरनल बारकोड (Code 128)
मान्यता (Recognition)विश्वव्यापी (Global)केवल आपके सिस्टम या दुकान तक सीमित
लागत (Cost)रजिस्ट्रेशन और सालाना फीस लगती हैबिल्कुल फ्री (सॉफ्टवेयर से जनरेट)
डेटा टाइप (Data Type)केवल 13 अंकों का नंबर (Numbers only)नंबर और अक्षर दोनों (Alphanumeric)
यूनिकनेस (Uniqueness)दुनिया भर में आपके प्रोडक्ट के लिए यूनिकसिर्फ आपके डेटाबेस/दुकान में यूनिक
रजिस्ट्रेशनGS1 संस्था से लेना अनिवार्यकिसी रजिस्ट्रेशन की ज़रूरत नहीं

निष्कर्ष: आपको कौन सा चुनना चाहिए?

GS1 बारकोड चुनें अगर:

  • आप अपने प्रोडक्ट्स को ऑनलाइन मार्केटप्लेस (Amazon/Flipkart) पर बेचना चाहते हैं।

  • आप देश-विदेश के बड़े सुपरमार्केट्स या डिस्ट्रीब्यूटर्स को माल सप्लाई करने का प्लान बना रहे हैं।

  • आप एक बड़ा ब्रांड बना रहे हैं और ग्लोबल पहचान चाहते हैं।

इंटरनल बारकोड (Code 128) चुनें अगर:

  • आपकी खुद की एक या एक से ज़्यादा दुकानें हैं जहाँ आप सीधे ग्राहकों को सामान बेचते हैं।

  • आपको सिर्फ अपने स्टॉक (Inventory) का हिसाब रखने और बिलिंग को तेज़ करने के लिए बारकोड चाहिए।

  • आपका बजट कम है और आप बिना किसी रजिस्ट्रेशन फीस के काम शुरू करना चाहते हैं।


फ्री में Code 128 बारकोड लोकल बिज़नेस के लिए कैसे जनरेट और प्रिंट कर सकते हैं?

 अपने लोकल बिज़नेस के लिए Code 128 बारकोड का इस्तेमाल करना न केवल आपका पैसा बचाता है, बल्कि इन्वेंट्री और बिलिंग को भी बहुत आसान बना देता है।

आप बिना कोई महंगा सॉफ्टवेयर खरीदे, अपने कंप्यूटर और साधारण प्रिंटर की मदद से फ्री में बारकोड जनरेट और प्रिंट कर सकते हैं। इसे करने के मुख्य दो तरीके हैं:

तरीका 1: फ्री ऑनलाइन जनरेटर और MS Word का इस्तेमाल (छोटे बिज़नेस के लिए)

अगर आपके पास गिने-चुने प्रोडक्ट्स हैं और आप शुरुआत कर रहे हैं, तो यह तरीका सबसे आसान है। इसके लिए आपको बाज़ार से सिर्फ A4 साइज़ की स्टिकर शीट (Label Sheet) लानी होगी जिसे आप अपने सामान्य लेज़र या इंकजेट प्रिंटर में इस्तेमाल कर सकें।

स्टेप 1: अपने प्रोडक्ट का कोड (SKU) तय करें चूंकि Code 128 में आप अक्षर और नंबर दोनों डाल सकते हैं, इसलिए एक ऐसा कोड बनाएं जो प्रोडक्ट को दर्शाता हो।

  • उदाहरण: मान लीजिए आप अपनी कंपनी के लिए एक स्टॉक कीपिंग यूनिट (SKU) बना रहे हैं। आप इसे NDL-DENIM-32 या NDL-TSHIRT-BLK जैसा नाम दे सकते हैं।

स्टेप 2: बारकोड जनरेट करें

  1. इंटरनेट पर किसी भी फ्री बारकोड जनरेटर वेबसाइट पर जाएं (जैसे: barcode.tec-it.com या barcode-generator.org)।

  2. बायीं तरफ दी गई लिस्ट में से Code 128 सिलेक्ट करें।

  3. टेक्स्ट बॉक्स में अपना प्रोडक्ट कोड (जैसे NDL-DENIM-32) टाइप करें।

  4. 'Generate' पर क्लिक करें और उस बारकोड की इमेज को PNG या JPG फॉर्मेट में Download कर लें।

स्टेप 3: MS Word में स्टिकर सेट करें

  1. MS Word खोलें और Mailings > Labels पर क्लिक करें।

  2. 'Options' में जाकर अपने A4 स्टिकर शीट के हिसाब से लेआउट चुनें (जैसे 1 शीट पर 24 या 65 स्टिकर)।

  3. 'New Document' पर क्लिक करें। आपको स्क्रीन पर स्टिकर के खांचे (Grids) दिखने लगेंगे।

  4. अब हर खांचे में अपनी बारकोड इमेज (Insert > Pictures) डालें और उसके नीचे प्रोडक्ट का नाम और MRP टाइप कर दें।

स्टेप 4: प्रिंट करें अपने प्रिंटर में A4 स्टिकर शीट लगाएं और प्रिंट कमांड दे दें। आपके कस्टमाइज़्ड बारकोड स्टिकर्स तैयार हैं!

तरीका 2: फ्री बिलिंग सॉफ्टवेयर का इस्तेमाल (प्रोफेशनल और रोज़मर्रा के काम के लिए)

अगर आप रोज़ाना कई प्रोडक्ट्स पर स्टिकर लगाते हैं, तो एक-एक करके बारकोड डाउनलोड करना मुश्किल हो सकता है। ऐसे में फ्री सॉफ्टवेयर सबसे कारगर होते हैं।

  1. सॉफ्टवेयर चुनें: आप Vyapar App (जिसका बेसिक वर्ज़न फ्री है) या Sleek Bill जैसे सॉफ़्टवेयर का इस्तेमाल कर सकते हैं।

  2. आइटम ऐड करें: सॉफ्टवेयर में 'Add Item' सेक्शन में जाएं। वहाँ प्रोडक्ट का नाम और उसकी कीमत डालें।

  3. ऑटो-जनरेट बारकोड: ज़्यादातर सॉफ्टवेयर में 'Generate Barcode' का ऑप्शन इन-बिल्ट होता है। आप बस अपना कोड डालें, और सॉफ्टवेयर खुद उसे बारकोड में बदल देगा।

  4. थर्मल प्रिंटर से प्रिंटिंग: अगर आपके पास TVS या TSC का थर्मल प्रिंटर है, तो आप सीधा सॉफ्टवेयर से 'Print Barcode' कमांड देकर एक साथ सैकड़ों स्टिकर रोल पर प्रिंट कर सकते हैं।

कुछ ज़रूरी टिप्स (Best Practices)

  • सही कंट्रास्ट: बारकोड हमेशा सफेद बैकग्राउंड पर काले रंग (Black on White) से ही प्रिंट करें। रंगीन बारकोड स्कैनर से पढ़ने में दिक्कत करते हैं।

  • साइज़ का ध्यान रखें: बारकोड इमेज को MS Word में खींचकर (Stretch) बहुत छोटा या लंबा न करें। उसका अनुपात (Aspect Ratio) बिगड़ने से स्कैनर उसे रीड नहीं कर पाएगा।

  • टेस्टिंग: पूरी A4 शीट प्रिंट करने से पहले सिर्फ एक सादे कागज़ पर प्रिंट करके अपने मोबाइल के बारकोड स्कैनर ऐप से स्कैन करके चेक कर लें कि वह सही नंबर दिखा रहा है या नहीं।